Stucco repair plays an important role in maintaining a long-lasting and stunning exterior for your home. It also enhances your property’s curb appeal, adding value to it.
Ignoring stucco cracks can lead to larger problems like water damage and mold growth. Performing timely repairs can help avoid costly restoration costs in the future. Contact Stucco Repair Philadelphia now!
Hairline cracks in stucco are not structural problems, but they should be filled to prevent moisture penetration. A simple and inexpensive repair is to use elastomeric caulk. It is a flexible material that can expand and contract with the changes in temperature. Apply it with a trowel, taking care to match the texture of the surrounding stucco. Mist it occasionally with water to keep it from drying too fast. It is best to do this in the a.m., as it is cooler and easier to work with.
Stucco cracks can range from minor to severe, and each type requires a specific repair method. Hairline cracks, for instance, are narrow, less than 1/16 inch wide, and often caused by natural settling or slight shrinkage of the underlying material. Typically, these are cosmetic, but they should be filled to prevent moisture intrusion.
To repair hairline cracks, first clean the area around them and dust off any debris. Then, mix a small amount of stucco patch with water according to the manufacturer’s instructions and apply it over the surface of the wall. Spread it to fill the crack, but be careful not to overfill. Then, smooth it with a trowel and feather the edges for a seamless transition. Allow it to cure for about 24 hours.
Wider cracks are more serious and should be addressed immediately, as they can lead to the formation of mold, which can damage the underlying structure. Also, it is possible that a foundation shift has occurred and the cracks are an indication of an ongoing problem that needs to be corrected. This could require the use of helical or push piers to stabilize the home against expansive soil.
Diagonal cracking, which can be seen around windows and doors, is usually a sign that the contractor did not adequately secure foam trim with fiberglass mesh tape during the installation process. It is best to investigate and attend to these cracks as soon as they appear. A professional can use the same technique to repair these cracks as with the smaller ones, but should always be sure to check the underlying lath for damage and structural issues before proceeding.
Remediating Cracks
Stucco is a type of plaster used for exterior coating of buildings and homes. It is made with cement, sand and water and it is applied wet. When it hardens, it becomes a very dense material. Many homeowners choose stucco as an exterior coating because of its durability and aesthetic beauty. However, as with any type of material, it can crack over time. When cracks appear, it is important to remediate them quickly to prevent further damage and extend the life of the stucco.
Hairline cracks in a stucco wall may seem cosmetic, but they can cause serious problems. They allow moisture and water to enter into walls where it is not wanted, leading to wood rot, mold growth, musty odors, swollen drywall and irreparable damage. The best way to deal with these small cracks is to use caulking and paint.
Before beginning to repair a crack in historic stucco, it is crucial to thoroughly evaluate the crack. This process includes assessing its size, shape and depth, as well as looking for any signs of moisture or water intrusion behind the wall. This will help you understand the full scope of the problem and will help you determine the most appropriate method of repair.
Once you have fully assessed the crack and gathered your materials, it is time to begin the repair process. Start by cleaning the crack and removing any debris. Then apply an acrylic bonding agent to the crack using a paintbrush. This will help the patch adhere to the existing stucco surface.
Next, prepare the crack for a patch by widening it to at least 1/4 inch using a cold chisel and hammer. If possible, try to chisel the edges of the crack to make them vertical or beveled in an inverted “V.” Once the crack is properly widened, it can then be patched.
The best way to patch a crack in stucco is to use a product that is specifically designed for this purpose. There are a number of options on the market, including Quikrete’s pre-mixed stucco patch. This product is easy to use and allows for expansion and contraction without cracking.
Repainting
If you’re noticing peeling, bubbling or cracking stucco it may be time to repaint. However, before covering up the eyesores, it’s important to examine the underlying cause. These issues could be a sign of a more serious problem that requires further repairs and may even lead to further damage if ignored.
Before painting, pressure wash the surface to remove dirt, debris and mold buildup. You should also caulk any hairline cracks to prevent moisture penetration that could potentially cause further damage to the stucco and underlying structure.
Once the stucco is clean, prime the wall with a high quality exterior latex primer to ensure your new paint will stick. Using a wire brush, scrub away any dust or other particles that have accumulated on the surface. This step is essential to ensure a strong bond between the new paint and existing stucco.
After priming, allow the primer to dry before you begin painting. Depending on the brand, you may need to apply a second coat. When applying your paint, be sure to follow the manufacturer’s directions on how many coats and drying times are required. Be sure to back roll your sprayer after each pass to work the paint into any crevices in the stucco. This is particularly important if the wall has a Spanish texture. It is also a good idea to look at the surface from different angles to catch any missed spots. Touch up these areas with a brush and blend them into the existing coat.
For best results, use a stucco specific interior/exterior paint that is water and stain resistant to prolong the life of your new finish. Stucco is a porous material that can easily absorb moisture, which can lead to mold and mildew if not addressed quickly.
Painting stucco can be a challenging project for homeowners who don’t have experience with the material. It’s recommended to hire a professional who is experienced in working with stucco to save time and money on expensive repair work down the road. It’s also crucial to have the right tools and safety equipment on hand, as it can be dangerous working with specialized materials and tools.
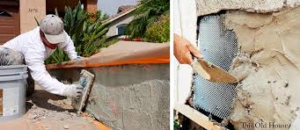
Replacing Stucco
Stucco has become one of the most popular materials for homes. It is durable, requires little maintenance and adds great curb appeal. It can also provide added energy savings over traditional wood siding and other types of cladding. However, like all things, stucco needs to be replaced or repaired at some point. So how do you know when it’s time to have your stucco re-done? Here are some telltale signs.
The first step in any stucco repair is to perform a thorough assessment of the damaged areas. It is important to understand how serious the damage is and to make sure that all major repairs (including wood work, wire lath work and sheeting) are addressed before starting on a smaller job. Ideally, a professional plasterer should be used for this initial assessment and major repairs.
Small hairline cracks can often be patched with a thin slurry coat of finish coat ingredients. This is usually done with a trowel. It is important to use a proper stucco mix rather than a caulking compound. Commercial caulking compounds have a different texture and consistency than stucco, and can cause problems in the long run, such as moisture intrusion and a poor aesthetic appearance.
If the damage to the stucco is widespread, if it appears moldy or if it is exhibiting a lot of cracking, it’s probably a good idea to have it completely replaced. This will prevent further damage and ensure that the underlying issues have been fully addressed.
The final step in a full replacement is to prepare the area where the new stucco will be placed. This involves covering the exposed wood lath with grade-D builder’s paper, which is then secured with roofing nails. It’s a good idea to add a second layer of paper to provide an extra barrier against moisture infiltration.